Introduction
The Connected Apps feature helps an external application to integrate with Anypoint Platform using APIs through OAuth 2.0 and OpenID Connect. Users can use Connected Apps without sharing sensitive credentials or giving full control of their accounts to third parties. End users can also authorise the app to access their Anypoint Platform Data. (You can find Connected Apps under Access Management in Anypoint Platform)
In this blog we will explore the connected apps feature in more detail and go through a step-by-step walkthrough.
You can use the Connected Apps feature to create a seamless authentication experience for end users. It focuses on three types of users:
- Organisation Administrator
- Organisation Administrator who is developing a Connected App
- End-User
In summary Connected Apps provide the following benefits:
- Connected Apps usage is tracked and auditable
- Granted access can be revoked
- Revoking granted access does not require users to change their password
Demo and Walk-through
Method - 1 (App acts on its own behalf (client credentials))
1) Sign in to Anypoint Platform with the credentials.
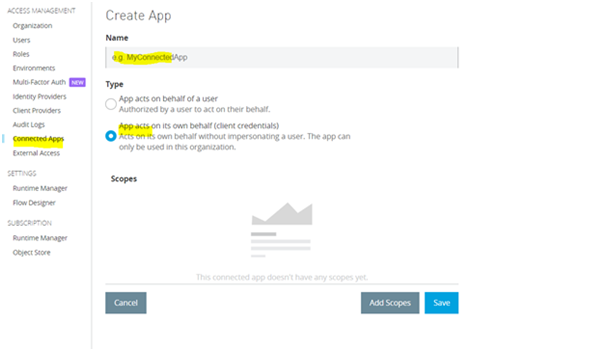
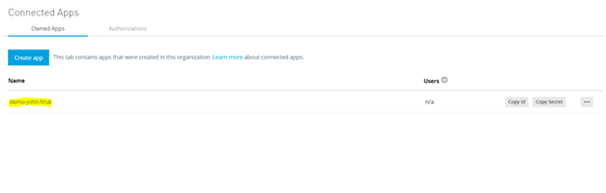
2) Click on Access Management and select Connected Apps. Go to the Owned Section and select Create App.
3) In the next window that opens, provide an app name, select the second type (App acts on its own behalf (client credentials))
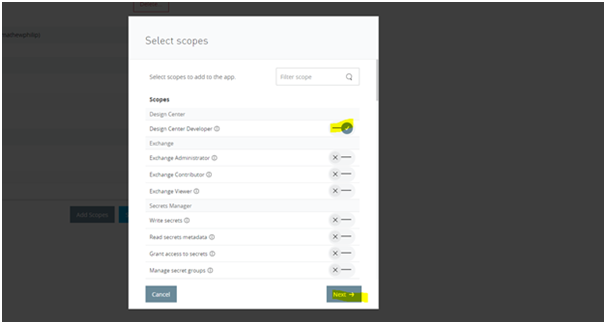
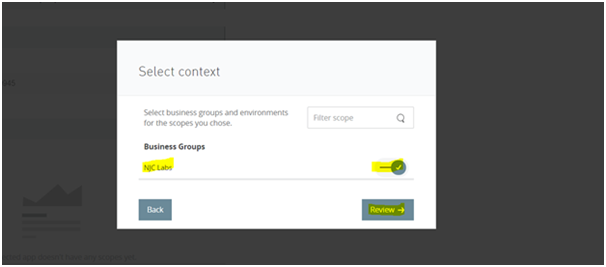
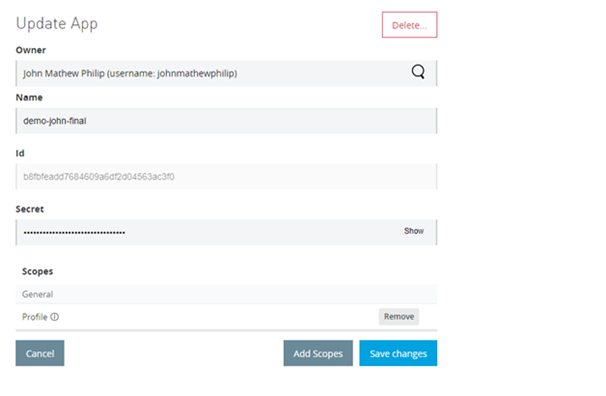
4) Click on add scopes and add the necessary scopes to be included for the application and also choose the required environments and organization if prompted, click on Review and add scopes. (have chosen design center developer scope for the demo)
5) Click on save and verify that the app appears in the connected Apps section.
6) Go to any client application (postman or ARC) and generate bearer token with the clientid and clientsecret of the connected app.
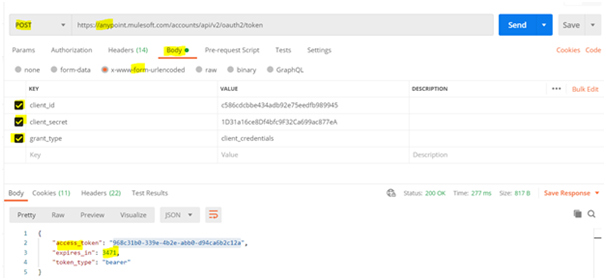
7) Copy the bearer token and keep it handy as this should be used as the token header to access the API end-points.
8) Choose an end point with regard to the selected Connected Apps scope. (Design center developer in this case)
9) For this demo, we have opted for the endpoint https://anypoint.mulesoft.com/designcenter/api-designer/projects. This endpoint will return all the projects that are present in the design centre. (Note that we have chosen this endpoint because it aligns with the scope we had opted for earlier)
10) Paste the above endpoint in postman or the desired client-tool and fill in the required parameters. (Authorisation header is the bearer token we retrieved earlier)
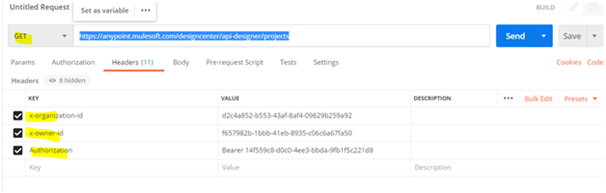
11) Hit the end point and we can see that the status code 200 alongside the response is shown.
12) Now let’s see the scope perimeters. Since this is a connected app and it should ideally restrict access to the unselected scopes. We can now remove the formerly defined scopes and try to hit the endpoint again.
13) Now it can be seen that the endpoint is returning a 401 unauthorised status code. This means that the endpoint’s scope access has been revoked.
Method - 2 (App acts on behalf of a user)
1) Click on access management and select the connected app.
2) Choose the grant type (have chosen Authorisation Code for this demo)
3) Here we will be using postman as the Redirect URI source platform.
4) Provide the redirect URI as : https://oauth.pstmn.io/v1/callback
5) Provide the website of the application or any dummy web address under Website URL.
6) Choose either All Anypoint Platform Users or only Members of this organisation under who can use this application.
7) Click on add scopes and choose the desired scope. (have chosen view environment for this demo)
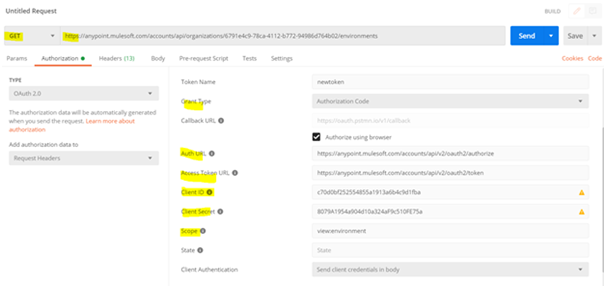
8) Go to postman or any other client tool and choose the endpoint that aligns with the selected scope. https://anypoint.mulesoft.com/accounts/api/organizations/{orgId}/environments
9) Choose Authorisation tab and select OAuth 2.0 and give the following values:
- Token Name : {any name for the token}
- Grant Type : Authorisation Code
- Tick the Authorise using browser box
- Auth URL : https://anypoint.mulesoft.com/accounts/api/v2/oauth2/authorize
- Client ID and Client Secret to be given from the connected app client id and secret.
- Scope : This is an important part and can be given from a list of pre-defined scope keywords found here. (Look for the supported scopes section. In this demo since we have chosen the scope as view environments earlier the scope value would be view:environment)
10) Click on get new access token and a new sign-in window with the connected app name will be popped up. Enter the username and password of the anypoint account and click on open with the postman in the next window . Authentication will be successful with this.
11) Click on use token and hit the end point. The request will return a success 200 status code. Since the scope is given to view environments only and if some other end point is accessed with this, it will return a 401 unauthorized status code.
Conclusion
To summarise, connected apps can be used to give access to Asset Consumers outside Anypoint Platform Premises or within. For such scenarios there will be requirements to restrict access to certain scopes and give access to certain scopes. Connected Apps can be used for these purposes and the same can be used with a fully-fledged front-end app to carry out the desired functions. A lot more can be done with connected Apps. such as publishing assets to exchange, deploying applications to cloudhub and a lot more. We will cover that in the upcoming sequels of this blog.