Anaplan – Enterprise Performance Management:
In this blog, we will look into MuleSoft Anaplan Integration and how to easily set it up, enhancing the digital transformation journey with improved connectivity. The Anaplan Connector for MuleSoft is an alternative to Anaplan Connect and allows you to build Anypoint flows.
Anaplan, is an enterprise performance management solution connecting people, data, plans across business into a single platform of planning model. It involves planning and modeling for business. Anaplan’s modular approach lets decision-makers in Sales, Finance, Supply Chain, HR, Marketing, and other business units model their unique organizational structure.
[Enterprise performance management solutions - processes designed to help organizations plan, budget, forecast, and report on business performance as well as to consolidate and finalize financial results . EPM solutions are primarily used by CFOs and the office of finance, while other functional areas, such as HR, sales, marketing, and IT, use EPM for operational planning, budgeting, and reporting. ]
Anaplan Components:
- Workspace – It is private area to hold the models
- Models - It contains full business use case
- Lists – It has dimensions, hierarchies, versions, time to use it in models
- Modules – It is multi dimensional & all together form models
- Line Items – It includes raw data and calculated data
- User Experience – It is an User interface to models
Anaplan Data Integration:
Anaplan data integration supports typical operations, such as importing data into Anaplan, exporting from Anaplan, deleting obsolete data from Anaplan, and running a process that combines one or more imports, exports, or delete actions. For example, import and export can be done with three types of interfaces:
- Anaplan graphical user interface, which supports manual Import and Export ( Manual Import from text files , Manual export to .xls, .csv, .txt, .pdf)
- Anaplan Connect command-line interface for automating imports and exports through a Windows batch file (or a UNIX/Linux/MacOS shell script) into a single process through the Anaplan Connect Client.
- Anaplan application programming interface facilitates the coders to have direct access to the API underlying Anaplan Connect.
Anaplan connector for Mulesoft:
- Anaplan Connector for MuleSoft is an alternative to Anaplan Connect and allows you to build Anypoint flows. Mulesoft Flows allow you to:
- Import data into Anaplan from a database, salesforce, CSV file, or other MuleSoft connectors.
- Export a recently updated Module or List from Anaplan into a CSV file, or import into a target, such as a database, salesforce, or other MuleSoft connectors.
- Perform data transformations on a schedule.
- Delete obsolete data.
- Perform a model-to-model import.
- Run Anaplan processes.
Note: Anaplan Integration with Mulesoft connector guide is found in the below link: connector guide
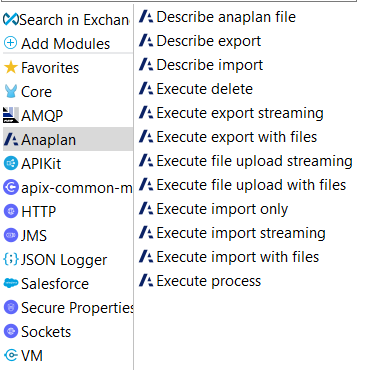
Operations Involved in Mulesoft with Anaplan Connector:
The below operations can be carried out with the connector:
- Execute import only – Run preconfigured Anaplan import action
- Execute import streaming - Imports data using streaming from other cloud apps like Salesforce, workday, etc.,
- Execute import with files – Imports files from any physical location and format should be .csv , .txt , Flat file with separator specified and Modules with correct LineItems has to be created already on Anaplan end before importing. Use the streaming option for with a Chunk Size 1-50MB of uncompressed data with no more than 1,000 chunks per file. This enables you to resume the transfer if the connection is lost during an upload.
- Describe import – Preview the uploaded data to be imported
- Execute export streaming – Export data from Anaplan to other cloud services like Salesforce, workday, etc.,
- Execute export with files - Export/download data from Anaplan to file
- Describe export – Preview data to be downloaded
- Execute file upload streaming -Upload the data to Anaplan but will not import to model from other services like Salesforce, workday, etc.,
- Execute file upload with files – Upload files to Anaplan but will not import to model
- Describe Anaplan file – Preview data to be uploaded
- Execute process - Run the preconfigured process on Anaplan created by admin which involves actions like import, export, delete operations
- Execute delete – Perform delete action already exists in model
Steps to Set up Anaplan Integration:
1. Create access for Anaplan:
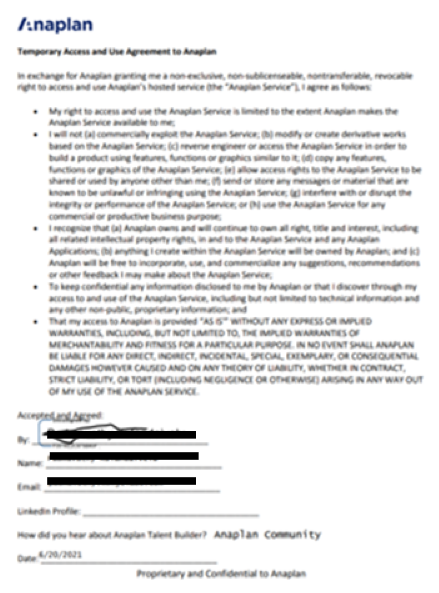
We need to get access by clicking ‘Add to waitlist’ tab in the link https://community.anaplan.com/t5/Anaplan-Access-Beta/ct-p/ATBReg , and it will open a link with the document(as mentioned in below screenshot) .The document has to be signed online and submit.
It will take a minimum 72 hours to get the mail with credentials to access Anaplan talent builder account.
Once the access has been provided, it will open the link where we can create and work on models in Anaplan. Since the admin access was not provided, Anaplan connector can be authenticated only with Basic Authentication not by CA Cert Authentication.
This link https://anaplanbulkapi20.docs.apiary.io/#introduction/bulk-api-index , helps to understand the operations involved in Anaplan API.
2. Set up export, import, delete actions in Anaplan
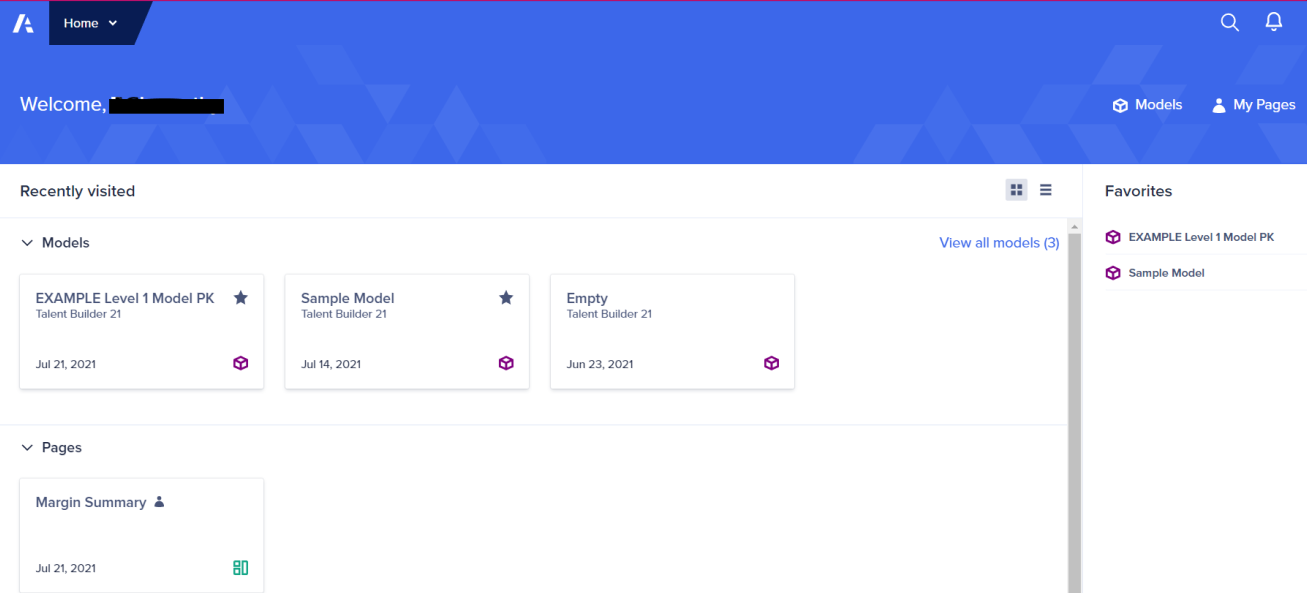
In the community portal of Anaplan https://community.anaplan.com/ , the course ‘Level 1 Model Building – Introduction’ will help us to learn about the modules, lists and functions in Anaplan and we can build a sample model with the provided data in the course as shown below.
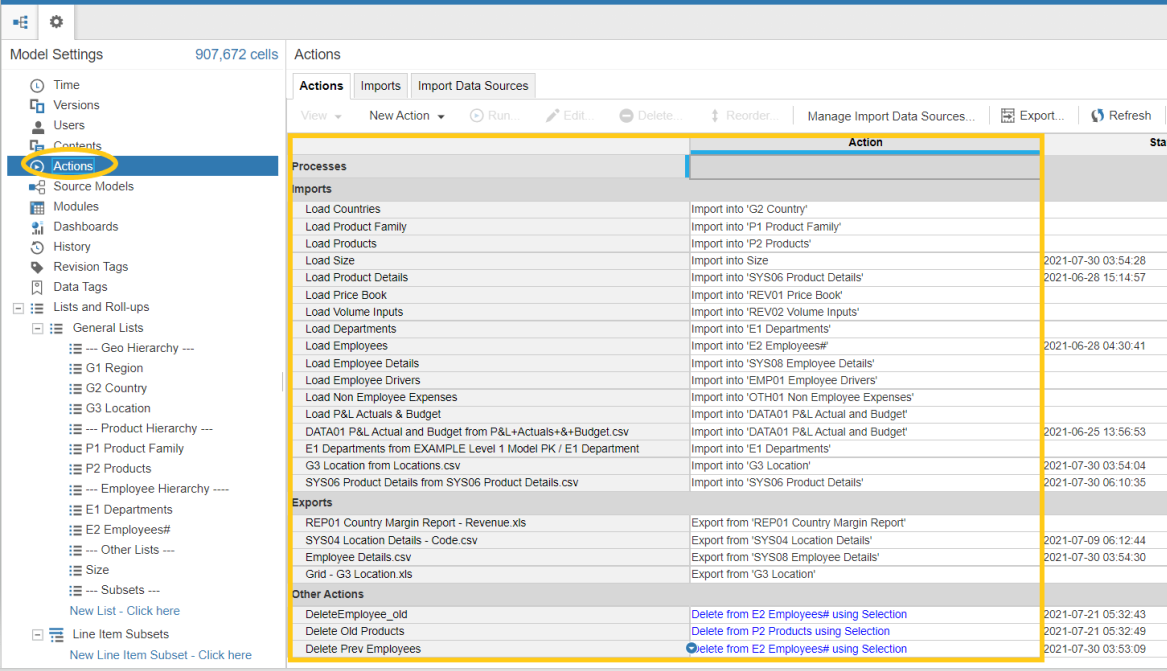
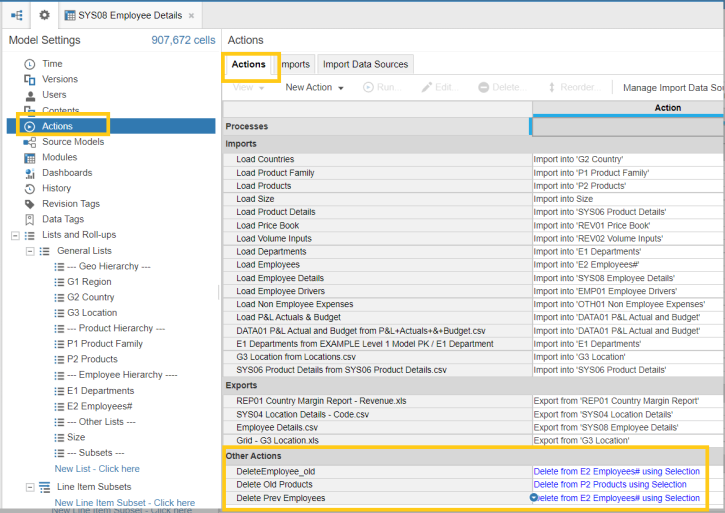
All the actions to be performed in the model will be listed as shown below.
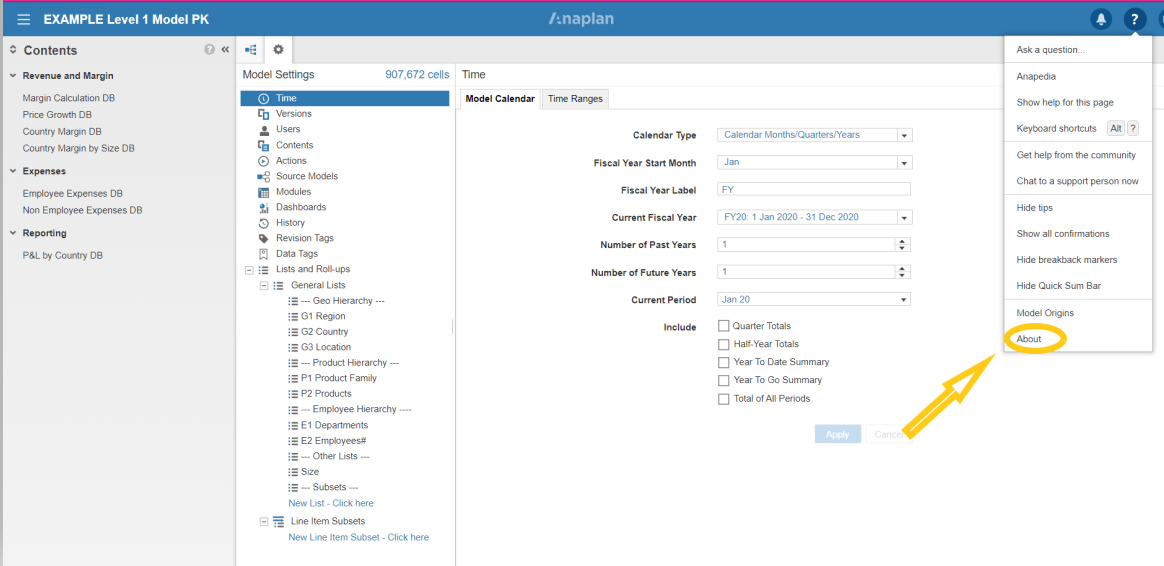
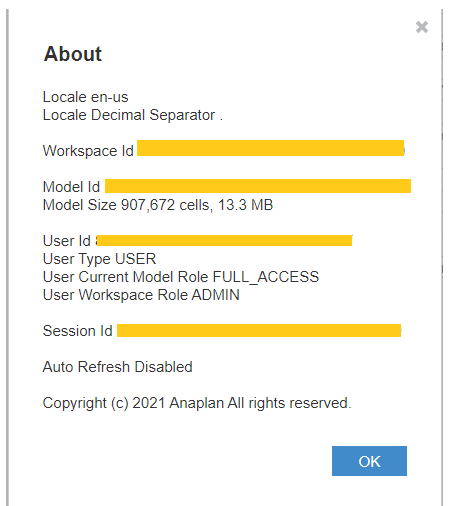
In order to access the data from Anaplan in Mulesoft, we need Workspace ID and Model ID corresponding to the Model which was developed in Anaplan along with the credentials. To get the Workspace ID and Model ID, go to ‘Help’ and click ‘About’.
3. Set up Anaplan Connector in Mulesoft
- Install the connector from Anypoint Exchange
- In Anypoint Studio, click the Exchange icon in the Studio taskbar.
- Click Login in Anypoint Exchange.
- Search for this connector and click Install.
To use the Mulesoft Anaplan connector in your Mule application:
- Place the connector in the flow.
- Store the authentication, connection or other settings in a Properties file as a Global Element and also secure the password by encrypting it with algorithms.
- For the Connection, select Basic auth connection or Cert Auth connection as per the requirement.
4. Set up Actions in Anaplan
Prior to performing integration with Anaplan, all the operations like import , export, delete, upload have to be defined and created in Anaplan already.
Once the actions are defined, the relevant names will be used as import/export/delete IDs in Mulesoft to carry out the functions.
Setting up of the actions like export, import, delete, upload will be shown as follows:
4.1 Define file upload
The file should be uploaded in Anaplan, so that it can be used later to import into the models or lists. To upload a file from Mulesoft, a file has to be there in Anaplan data sources already.
Go to ‘Actions’ in Anaplan and select ‘Import Datasources’ and click ‘New Source’ and ‘Upload new file’.
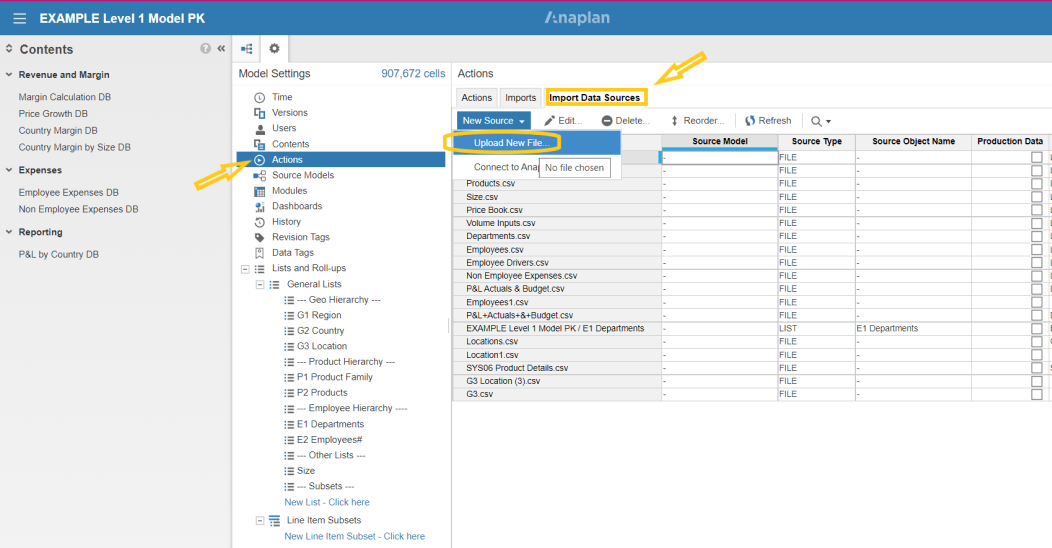
Then upload the file by selecting relevant options as shown below and save.
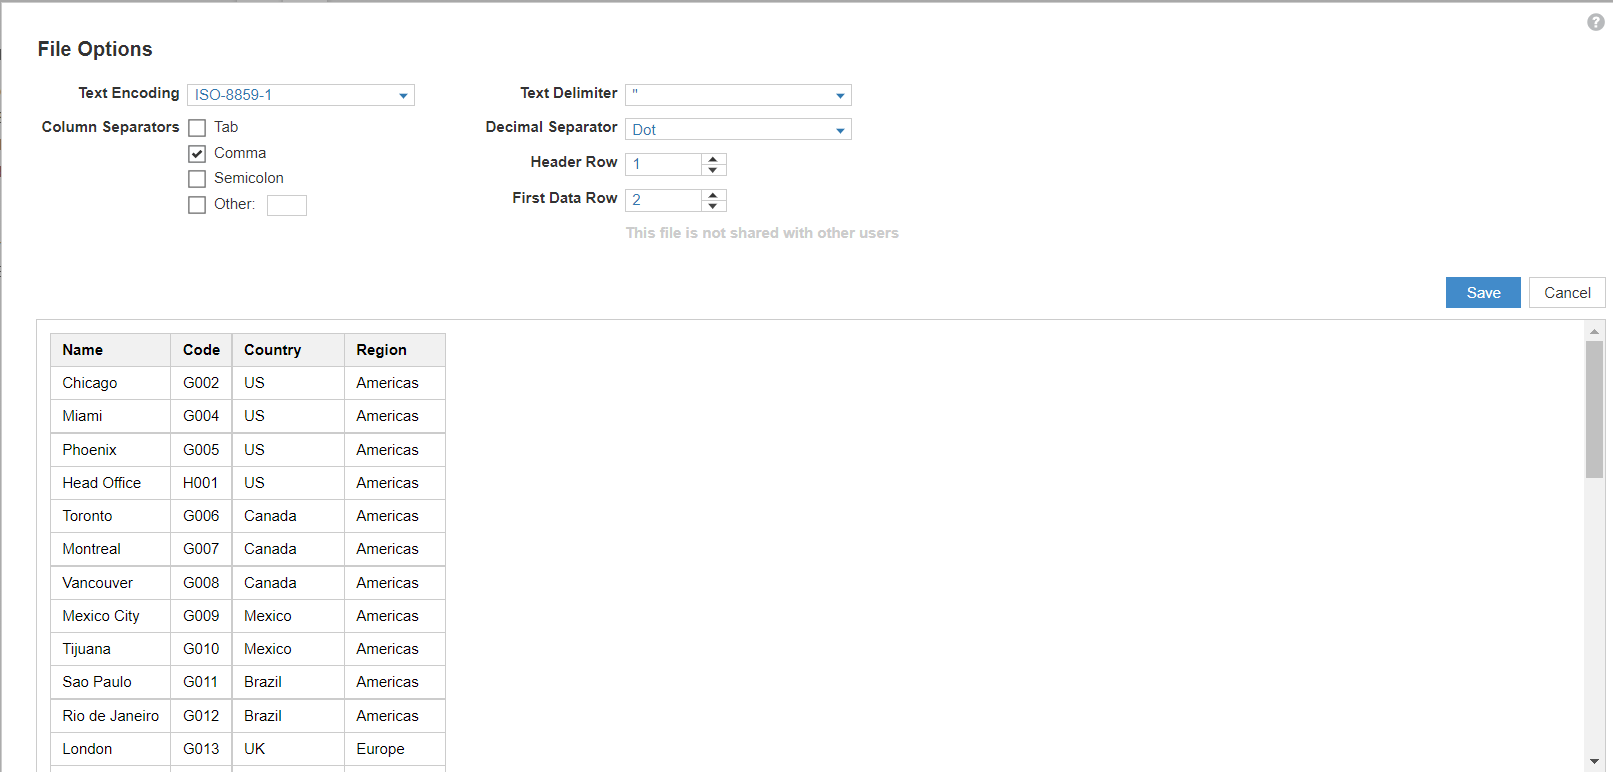
All the uploaded files will be in ‘Import Data Sources’. These files in Import Data Sources will be used by Mulesoft to perform upload operations in Anaplan.
4.2 Define Import Action
Import action can be defined for all lists, models , lineItems , etc., in Anaplan.
Go to the corresponding lists/models and choose ‘import’ .Then Choose file from the list or upload new file and save.
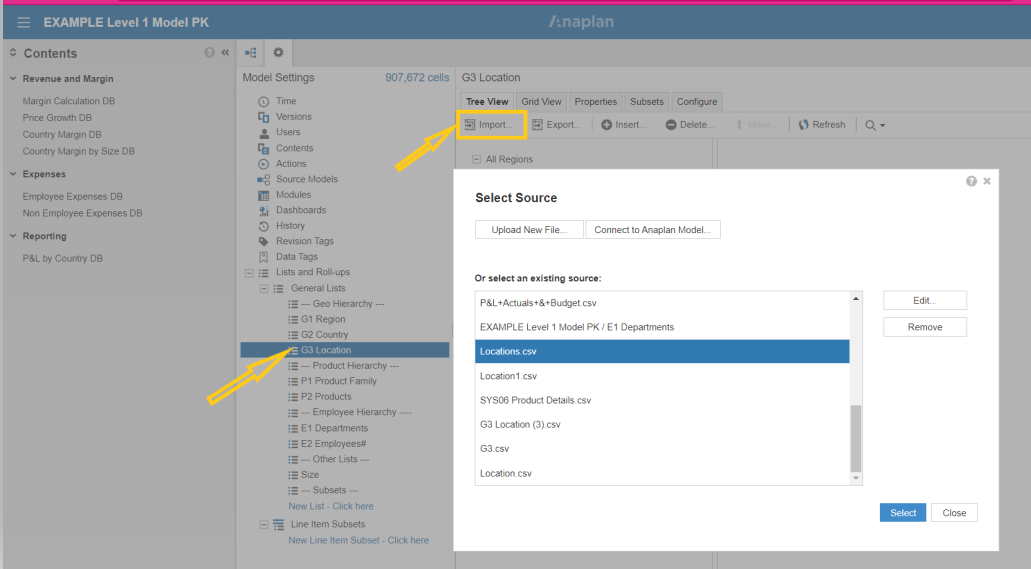
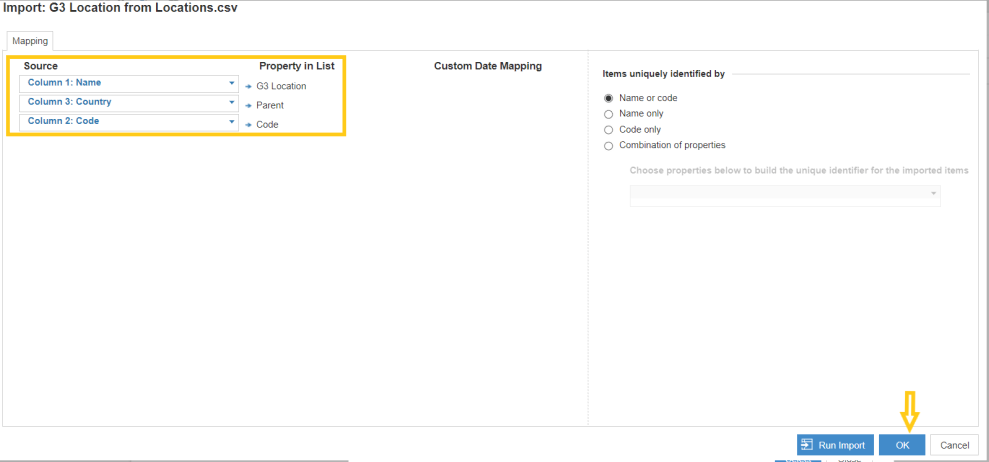
We can perform mapping from source fields in file to the Anaplan fields and can choose a unique identifier while importing. If the import has to be performed immediately then choose ‘Run’. Otherwise, it will get saved as action.
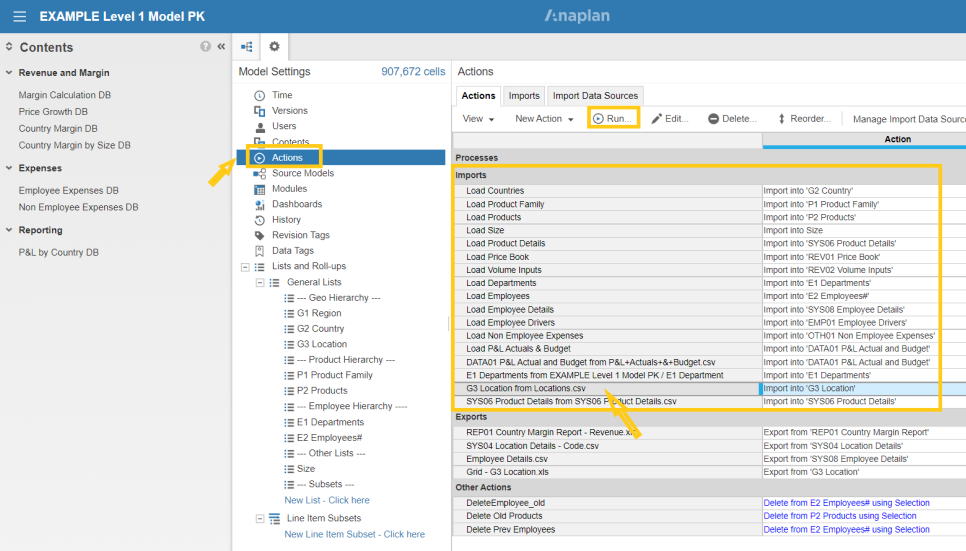
Then the list of imported actions can be seen in ‘Actions’ tab where we can find relevant uploaded files. We can ‘Run’ manually the import action to get the data imported to the model from the file. And this import action can be automated from Mulesoft through the Anaplan connector.
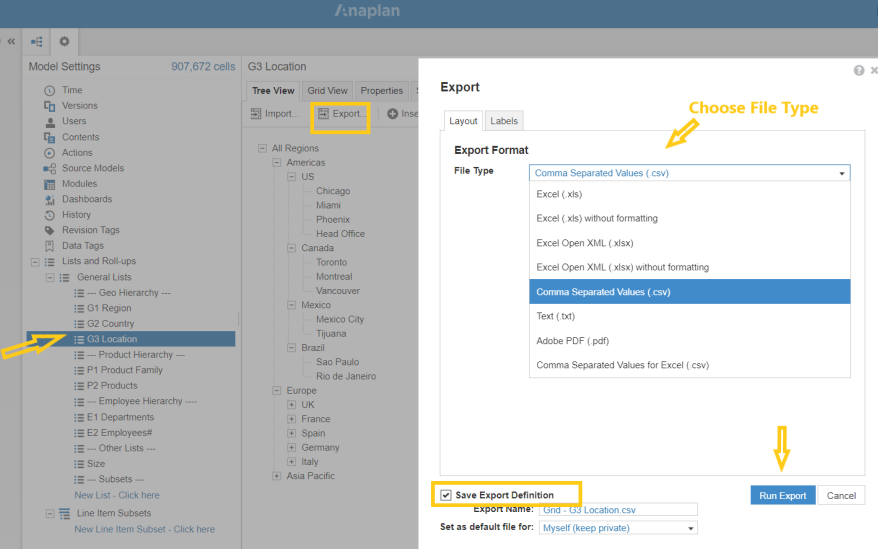
4.3 Define Export Action
Export action can be defined for all lists, models, lineItems , etc., in Anaplan.
Go to the corresponding lists/models and choose ‘export’. Then choose the file type to be exported from the list like csv/txt/xls and click ‘save export definition’ to save this export action which will be further called from Mulesoft and Run Export.
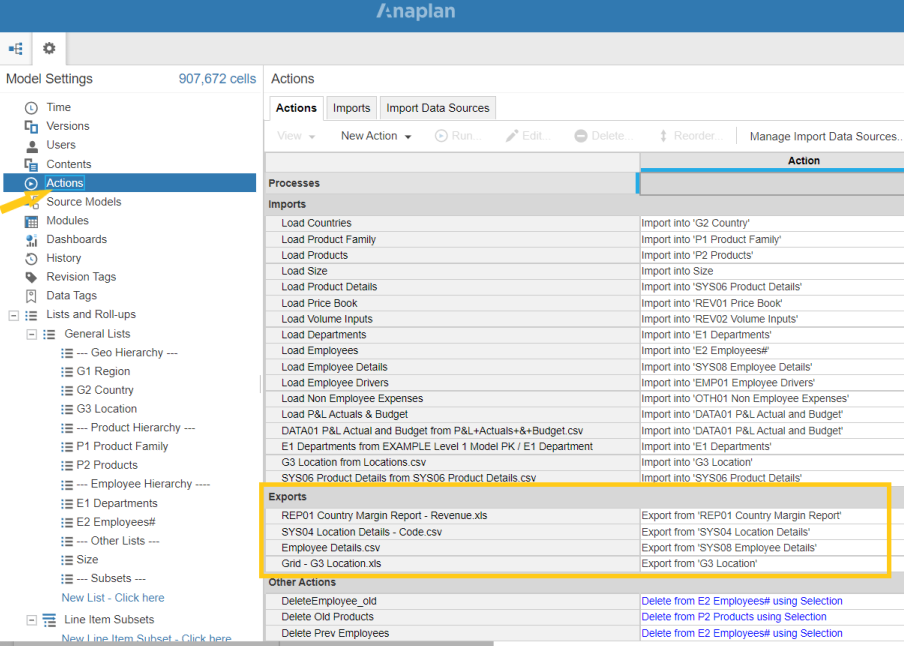
Then the list of exported actions can be seen in ‘Actions’ tab where we can find relevant uploaded files and can ‘Run’ the export action to get the data exported to the file with the selected format.
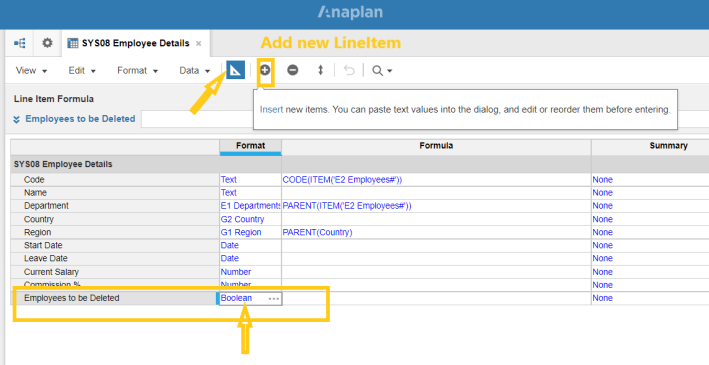
4.4 Define Delete Action
Delete action can be defined for all lists, models, lineItems , etc., in Anaplan to remove unwanted data from the model . For example, if the business team doesn’t want previous employee’s details or unused product details, it can be deleted from Mulesoft as scheduler or manual operation.
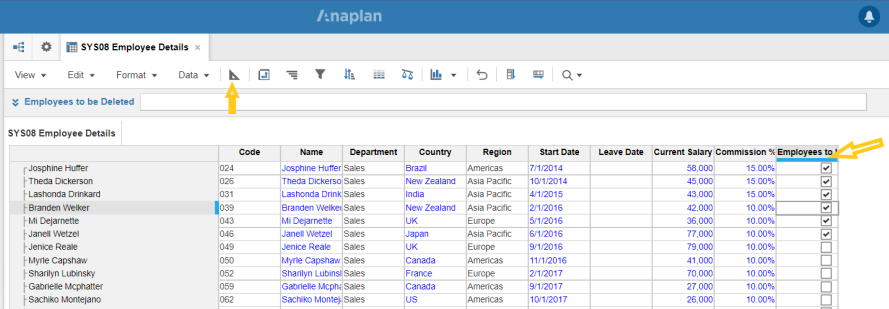
To create a delete action, go to the corresponding models and choose the ‘toggle’ button. Then add new field ‘to be deleted’ with Boolean type
Then again ‘toggle’ and can choose the list of entries to delete.
Go to ‘Actions’ and choose ‘New Action’ and ‘Delete from List using Selection’. Then, provide all the details as mentioned below and click ‘OK’.
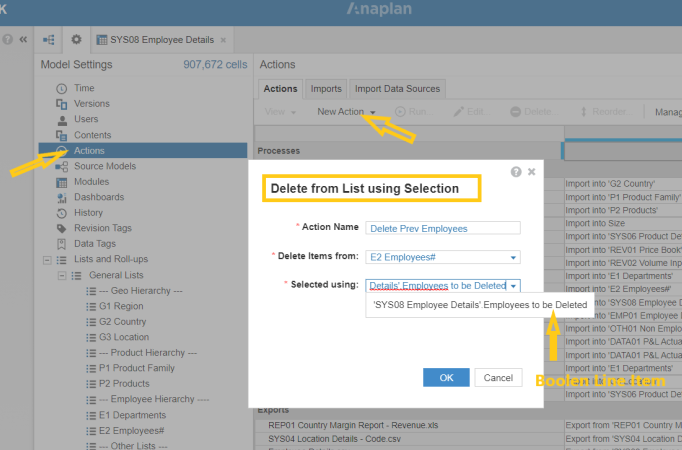
Then the list of delete actions can be seen in ‘Actions’ and can ‘Run’ the delete action to remove the data from models manually or it can be automated from Mulesoft to perform this operation.
Anaplan – Mulesoft Integration:
Now, we are going to see the details of most of the operations that can be performed in Mulesoft to integrate data with Anaplan by providing appropriate workspace ID and Model ID along with other details.
Note : Prior to performing all the operations in Mulesoft , we have to create export, import, delete actions in Anaplan as explained in the previous document. Once the actions are created, it can be invoked by Mulesoft based on action names.
1. Describe Import
Describe Import connector enables to preview the uploaded data to be imported in Anaplan. A maximum of 20 lines is shown. Prior to importing, the data will be uploaded as file in Anaplan.
To view and verify the uploaded data prior to import, ‘describe import’ function is being called.
- In the MuleSoft Anaplan v3.1.0 Connector tab, select Describe Import Action.
- Enter the workspace ID, Model ID and the Import ID(Import Name/ID from Anaplan).
- Enter the payload with mapping parameters like locale name, entity (Budget, Actual, Forecast).
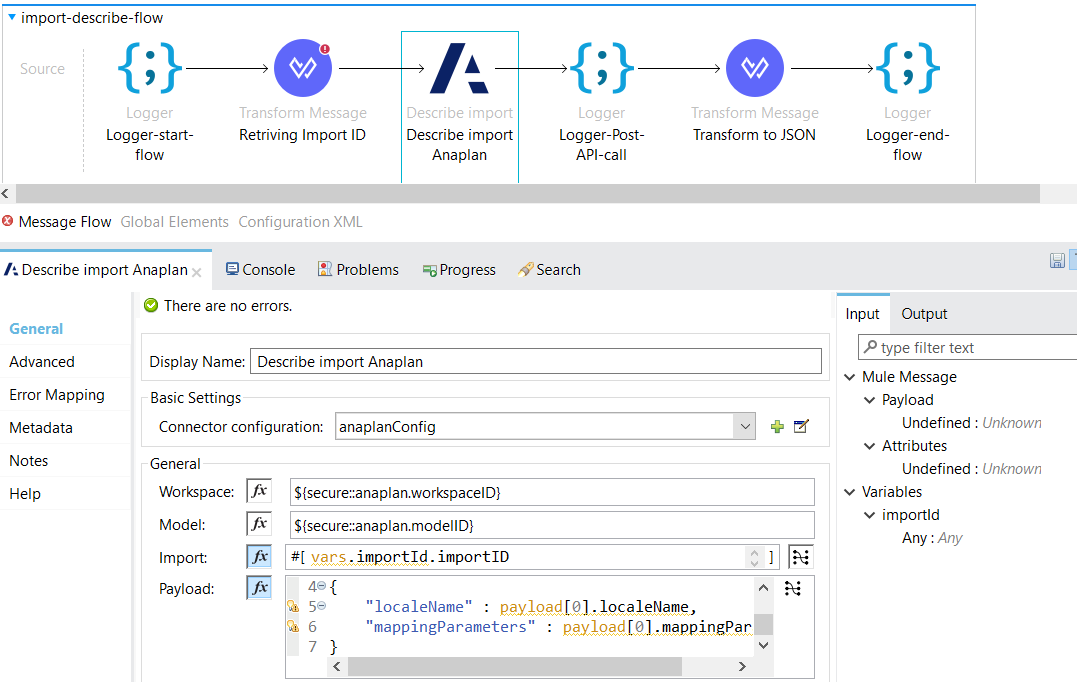
The result of Describe Import function would be the details of the file to be imported with all the list names, data types, file format,etc., from Anaplan.
2. Describe Export
Describe Export connector enables to preview the data to be exported from Anaplan. A maximum of 20 lines is shown.
To view and verify the exporting data prior to export, ‘describe export’ function is being called.
- In the MuleSoft Anaplan v3.1.0 Connector tab, select Describe Export Action.
- Enter the workspace ID, Model ID and the Export ID (Export Name/ID from Anaplan).
- Enter the payload with mapping parameters like locale name, entity (Budget, Actual, Forecast).
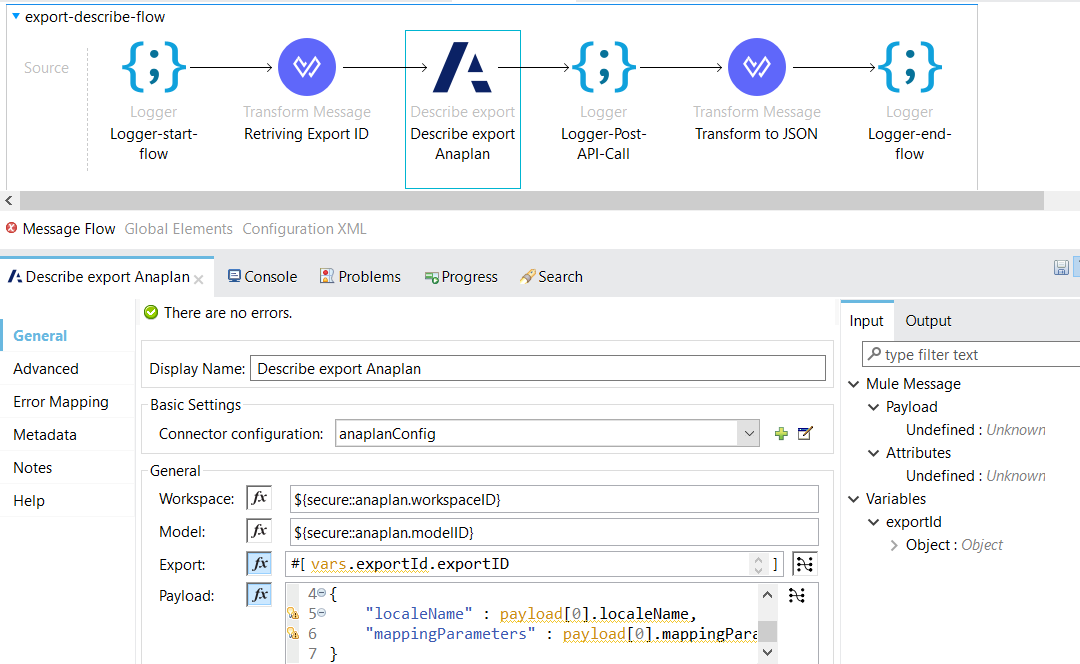
The result of Describe Export function would be the details of the file to be exported with all the list names, data types, file format,etc., from Anaplan.
3. Execute import with files
Execute Import with Files connector uploads and imports data to Anaplan using temporary files stored in a physical location in a server.
While calling Import with Files we need to provide the Import ID, Import source file path, temporary chunk folder and chunk size of 1-10MB.The chunks are to be temporarily stored prior to being uploaded or imported. After importing the file to Anaplan , if the source has to be deleted, set the property as true or by default source file will not be deleted.
- In the MuleSoft Anaplan v3.1.0 Connector tab, select Execute Import with Files.
- Enter the workspace ID, Model ID and the Import ID(Import Name/ID from Anaplan).
- Enter the import file path from where the file will be picked up and imported to Anaplan.
- Enter the Temporary chunk folder and chunk size of 1-10MB.The chunks are to be temporarily stored prior to being uploaded or imported.
- Enter the Retry count and dump file path.
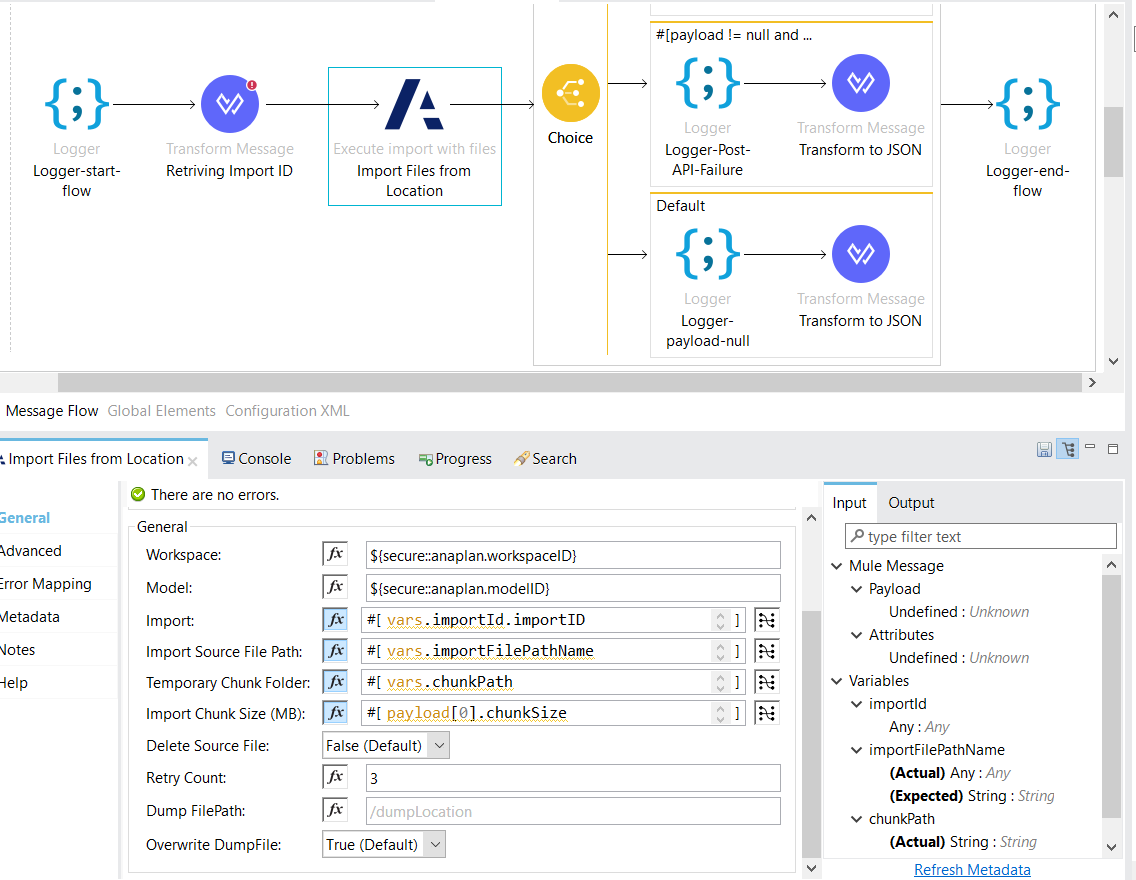
Once the data in the file has been imported successfully to Anaplan , it returns with the ‘successful’ message as true. If there is failure in importing to Anaplan it would return as ‘false’ unless there is any connectivity issue.
4. Execute export with files
Execute export with files connector runs an export using temporary files to any physical location in a server. Using this exported data from Anaplan can be downloaded to any server for relevant functionalities.
- In the MuleSoft Anaplan v3.1.0 Connector tab, select Execute Export with Files.
- Enter the workspace ID, Model ID and the Export ID (Export Name/ID from Anaplan).
- Enter the temporary folder where the Anaplan data is exported to the physical location as file.
- Enter the Retry count.

Once the data from Anaplan has been exported successfully, it would return the details of the exported data.
5. Execute delete
Execute delete connector runs a preconfigured delete action in Anaplan. Prior to using this connector, as mentioned the delete action has to be already created in Anaplan and can be invoked in Mulesoft with the action name.
- In the MuleSoft Anaplan v3.1.0 Connector tab, select Execute Delete.
- Enter the workspace ID, Model ID and the Delete Action name of Anaplan.
- Enter the Retry count.
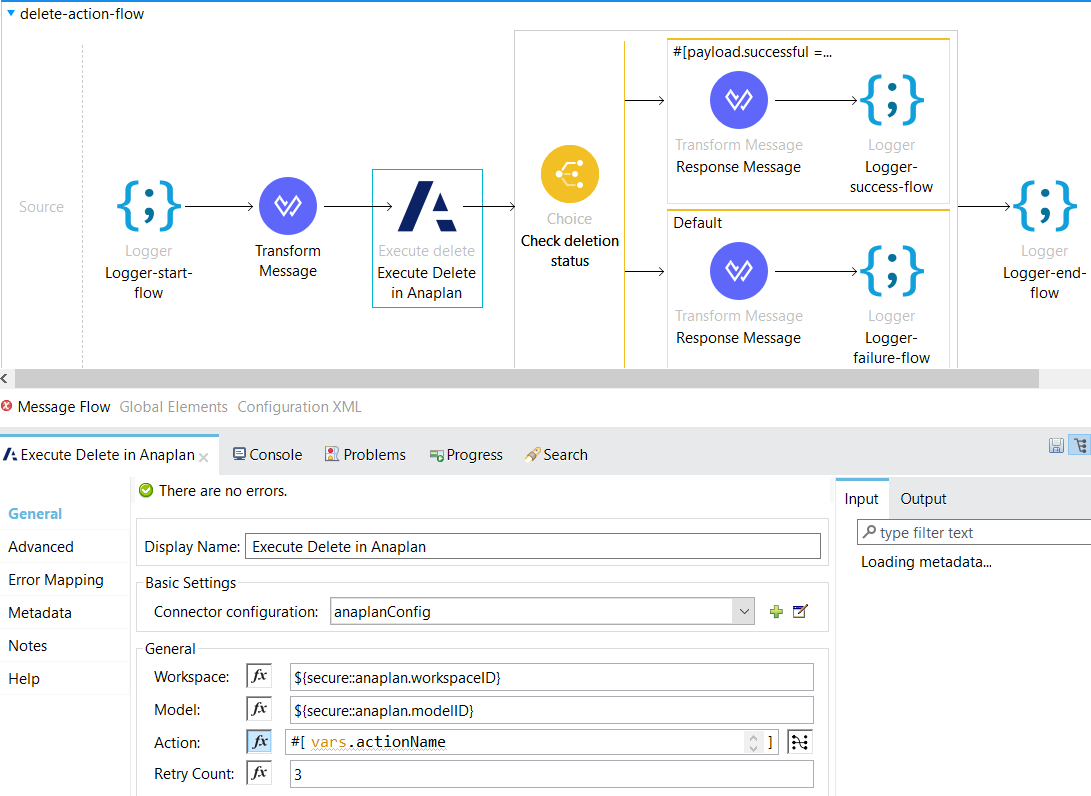
Once executed, it would return whether the action has been performed successfully or failed in Anaplan as response.
6. Execute file upload streaming
Execute file upload streaming connector uploads a file using streaming from other cloud services like Salesforce, Workday, etc.,. This uploads the data to the corresponding file in Anaplan, but it does not import the data to the model.
To upload the streaming to the file, the file has to be created in Anaplan already. This connector won’t create new files in Anaplan.
- In the MuleSoft Anaplan v3.1.0 Connector tab, select Execute file upload streaming.
- Enter the workspace ID, Model ID and the file name of Anaplan.
- Enter chunk size of 1 -10 MB. The chunks are to be temporarily stored prior to being uploaded or imported.
- Enter the Retry count.
- Enter the streaming payload to be uploaded for the file in Anaplan.
- Map the data from source to the corresponding fields in Anaplan prior uploading to Anaplan.
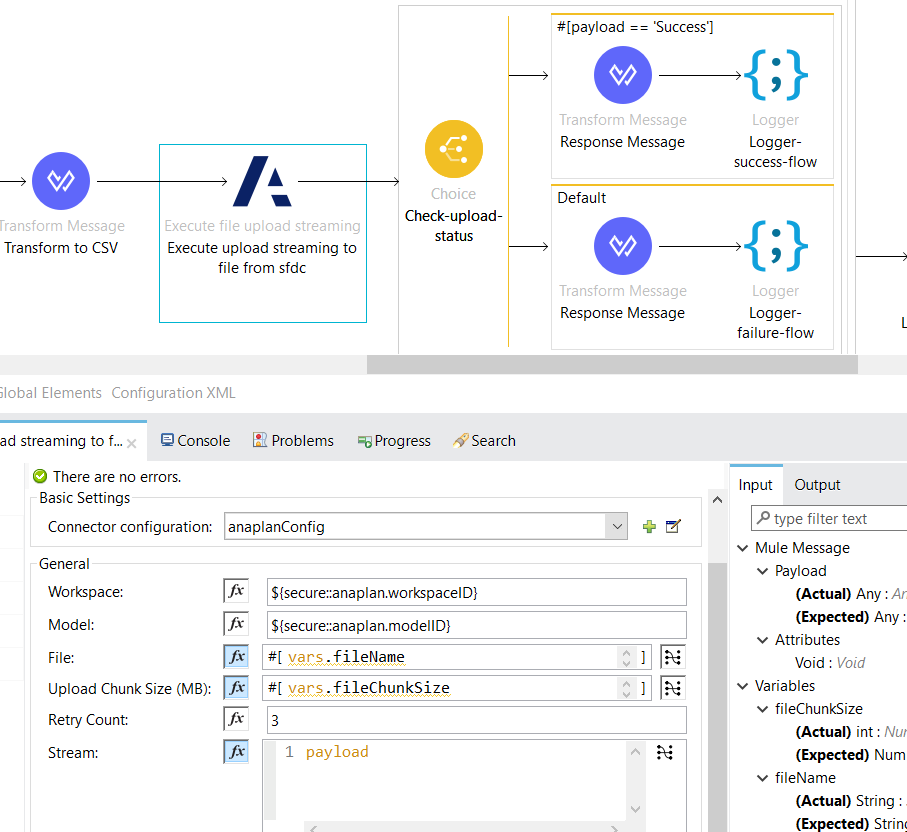
Once this is executed, the streaming data from Salesforce/workday/etc., has been uploaded to the file in Anaplan and will return the details of upload with the success/failure message
7. Execute import streaming
Execute import streaming connector import streaming data from other cloud services like Salesforce, Workday, etc.,. Use the streaming option with a Chunk Size 1-50MB of uncompressed data with no more than 1,000 chunks per file. This enables it to resume the transfer if the connection is lost during an upload.
- In the MuleSoft Anaplan v3.1.0 Connector tab, select Execute import streaming.
- Enter the workspace ID, Model ID and the Import Name/ID of Anaplan.
- Enter Import chunk size of 1 -10 MB. The chunks are to be temporarily stored prior to being uploaded or imported.
- Enter the Retry count and the Dump file location
- Enter the streaming payload to be uploaded for the file in Anaplan.
- Map the data from source to the corresponding fields in Anaplan prior importing to Anaplan.
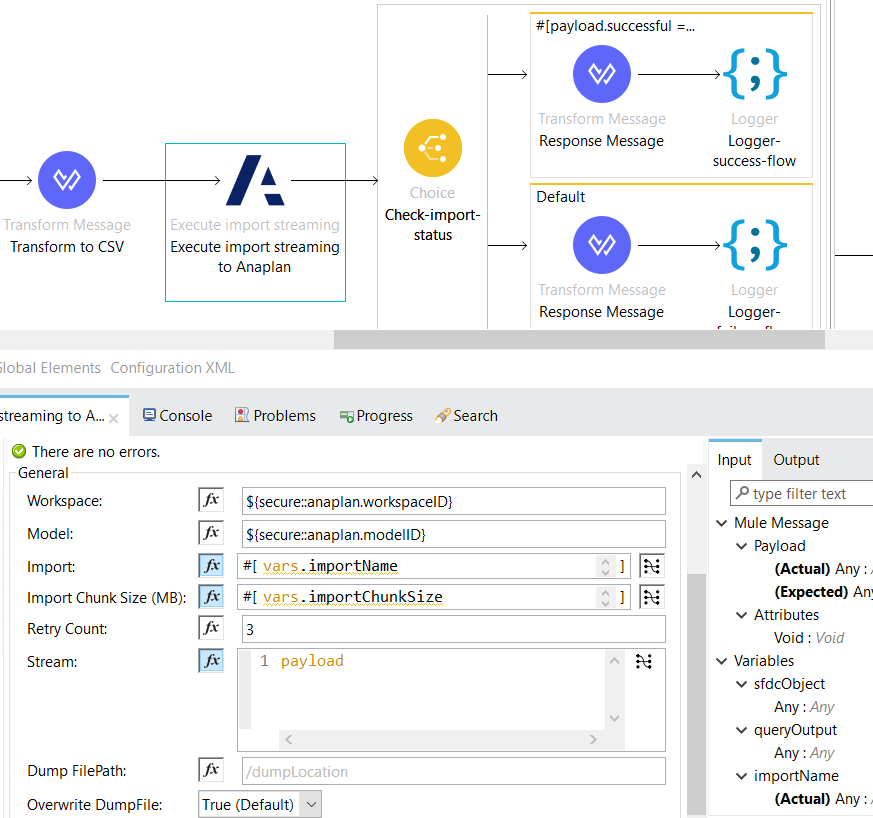
Once it is executed, the data from other cloud services like Salesforce,workday,etc., has been imported to Anaplan and will return the details of import with the success/failure message.
8. Execute export streaming
Execute export streaming connector export streaming data from Anaplan to other cloud services like Salesforce, Workday, etc.,. Use the streaming option with a Chunk Size 1-50MB of uncompressed data with no more than 1,000 chunks per file. This enables it to resume the transfer if the connection is lost during an upload.
- In the MuleSoft Anaplan v3.1.0 Connector tab, select Execute import streaming.
- Enter the workspace ID, Model ID and the Export Name/ID of Anaplan.
- Enter the Retry count.
- Once the data has been exported from Anaplan, either Publish & consume to/from VM queue or read & write in a file to retrieve the streaming data.
- Once streaming data has been retrieved, map the data to the corresponding fields of target systems.
- Send the data to the corresponding target systems as input.
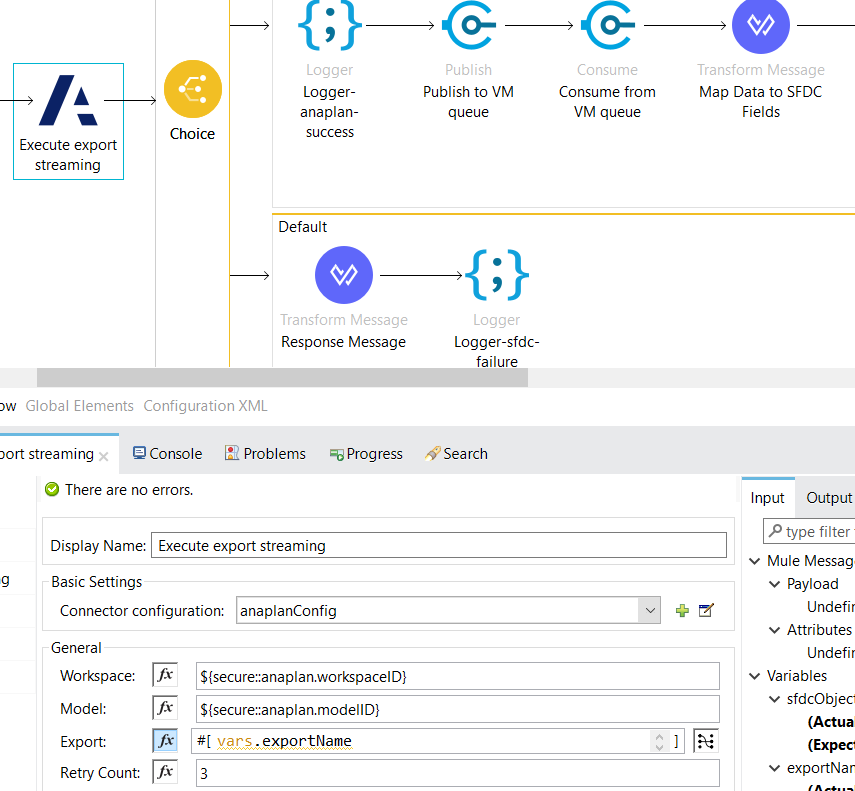
Once it is executed, the data from Anaplan has been streamed to other cloud services like Salesforce, workday, etc., and will return the details with the success/failure message.
Conclusion:
Anaplan MuleSoft Integration supports integration of SaaS and on-premise sources with Anaplan. The Anaplan MuleSoft Connector can handle data mapping, security, import, export, synchronization, replication and monitoring.
References:
https://community.anaplan.com/t5/Anaplan-Access-Beta/ct-p/ATBReg
https://anaplanbulkapi20.docs.apiary.io/#introduction/bulk-api-index